

创作上传
VIP
收藏下载
登录 | 注册有礼
查看完整案例


收藏

下载

分享
翻译
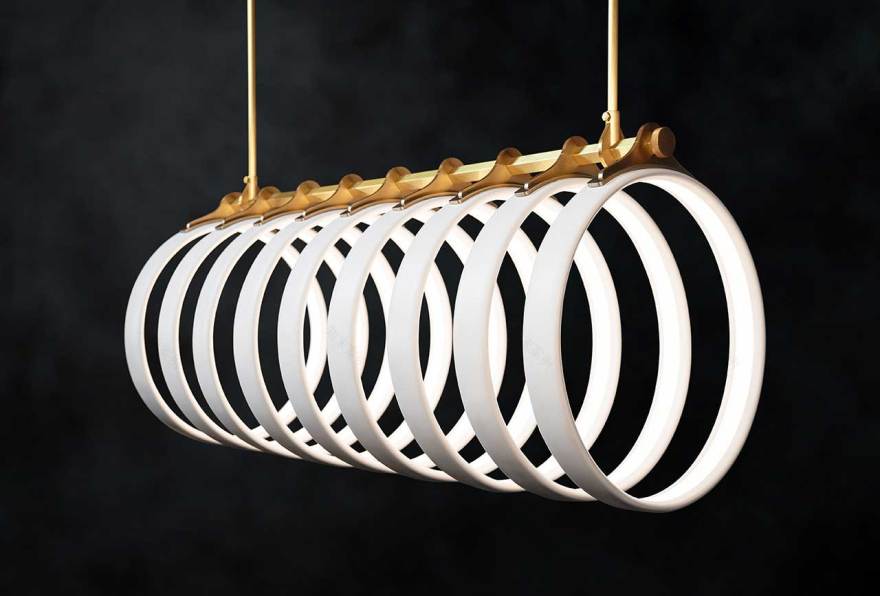
After five years of envisioning this design in his head and on paper, Ted Bradley walked away from his job to make the Samsara light sculpture come to life. Instead of the two months he anticipated the build taking, it actually took more than a year to perfect the design, and that’s after making five mold systems, experiencing hundreds of ring failures, and using 1,300 pounds of clay. Inspired by the arching ribs of sun bleached whale skeletons, the fixture balances the tension between the fragile porcelain rings and the strength of the solid brass spine. From the looks of it, the laborious process was worth it when you see the finished product, the Samsara 9 Chandelier. Read on to see just how labor intensive this light sculpture is to make, in this month’s Deconstruction . Vision, Sketching, Modeling, Planning

It started with a feeling or maybe a mix of feelings all mashed together and a flash vision of a shape that represented them. It was white porcelain hoops lined up in a row and attached to a spine, like the arching ribs of a whale skeleton bleached in the sun. There’s death in the sculpture, life and a tension between the grace/fragility of the porcelain rings and the strength/rigidity of the metal spine which were things I was working through in my own life. I sketched the vision dozens of times over five years, and finally, I built up the courage to leave my job so I could work full time on bringing it into reality. I thought it would take 2 months to build it. But after 5 mold systems, hundreds of ring failures, and 1,300 pounds of clay, it had taken more than a year to finish.

The first step was to create a full-size mockup to decide on the ring size, number of rings and spacing.
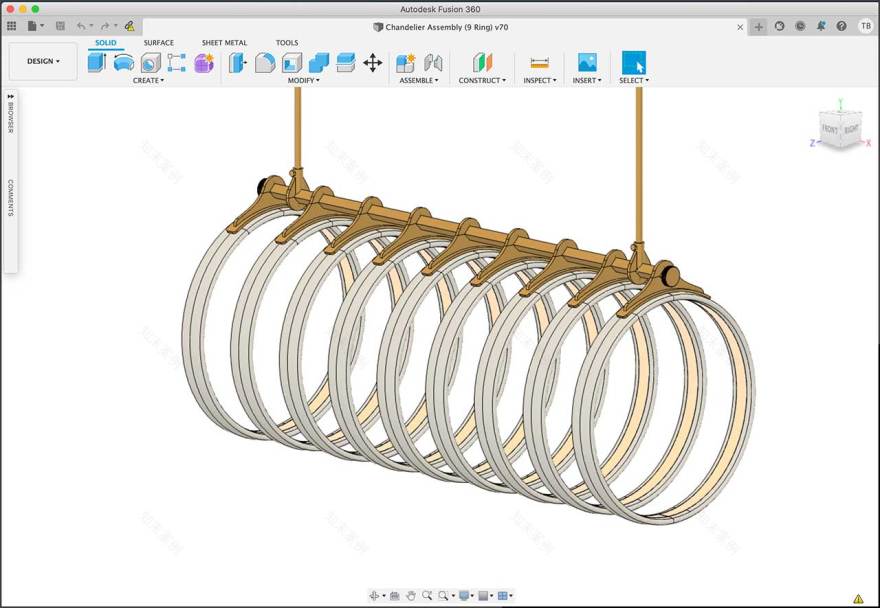
Then I created a CAD model to dial in the aesthetic details, mechanical connections and how the electronics would fit in. Building the Mold

I used the CAD model to 3D print a ring that would be used as the positive to create a plaster mold.

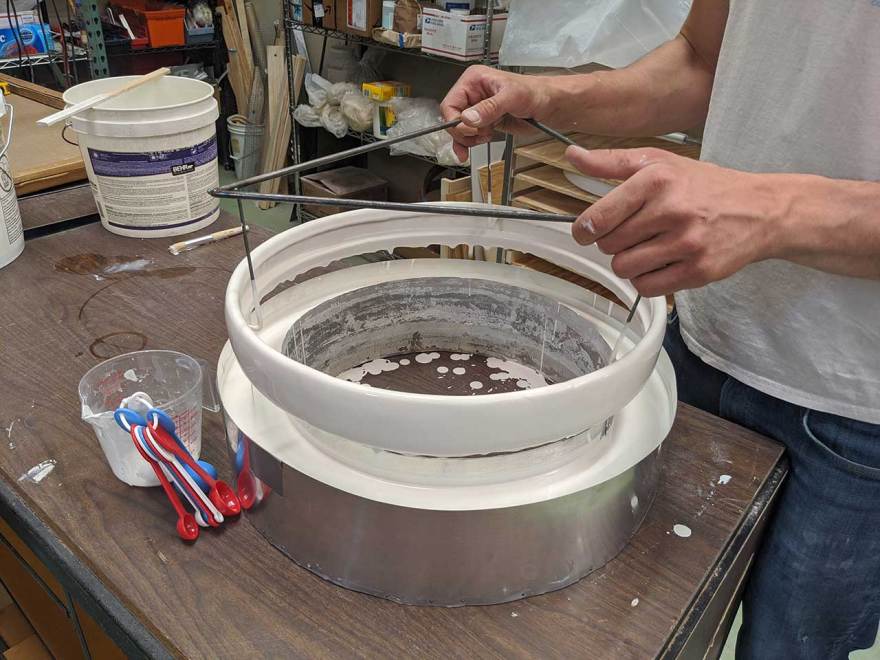
I tested a number of different mold systems and finally landed on an air release die. There’s cotton tubing wound throughout the inside of the plaster, so when it’s all finished you can hook compressed air up to the mold. The air pushes moisture out of the plaster and creates a thin layer of water on the plaster surface that helps eject the clay part. The molds kept breaking from high pressure, so I welded a steel armature to be encased inside the plaster.

Here it is just before pouring the plaster.

Here it is with the plaster poured.

Here’s the final result of the mold ready to go. The mold halves are too heavy to lift by hand so I had to build a half-ton gantry crane and pulley system over my workspace. Selecting Clay, Glaze, Forming a Ring

I created test tiles for 17 porcelain recipes and firing temperatures to find the brightest white combination. I settled on a porcelain from New Zealand that is the whitest of all that I tested, but that is also notoriously difficult to work with because of how brittle it is when dry.

I tested dozens of glaze recipes and application methods to find the whitest color that also had the finish I wanted, not too glossy but smooth like polished bone.

Now we’re ready to make a ring. I bolt the two mold halves together, pack the mold full of clay, and then use the air release system and overhead lift to carefully separate the mold halves and eject the rings.

Here’s what the ring looks like when it comes out of the mold. I use a flat razor blade to trim away the flashing.

The ring is very delicate when the clay is wet, so it can’t be lifted like you would a clay mug or bowl. I built this tri-arm ring lifter to be able to move the rings without causing distortion. Drying, Glazing, Firing, Inspection

Then the ring goes into the drying chamber. I installed Bluetooth humidifier sensors hooked up to a wifi gateway so I can monitor the humidity levels from my phone 24/7 to make sure the chamber stays in an optimal range.

I spent about 4 months debugging cracking issues during the drying phase.

When the ring comes out of the drying chamber I sand it down with a plaster screen to give it a smooth surface.

The ring gets bisque fired.
The ring gets dip glazed.

The final ring is inspected and measured for size, roundness and defects. The rings need to be consistent within 0.08” to marry properly with the metal and light-diffusing lenses. I made more than a hundred rings to get my first batch of 9 that would be used in the final sculpture. LEDs, Electronics, Testing

The next step was to test light-diffusing lenses that would go over the top of the LEDs to get the right glow, light color, brightness and ensure individual LEDs aren’t visible.

Then I test the integration of the LEDs in a test section of the ring, with the light diffusing lens over top. I measured the power consumption to determine the required wire gauge, transformer capacity and light output. To ensure it would be safe to use, I embedded the thermocouples inside the assembly and ran it at full power to measure its heat output. This was preparation for sending the ring to a UL safety certification test lab. Metal Fabrication & Finishing

The simple brass parts I machine by hand using a 2-axis milling machine. The more complex parts get CNC milled and lathed by a local machinist.

I experimented with polishing techniques, patina solutions and spray coatings to get the right finish.

Then the process gets repeated for all 45 brass parts. Here they are finished. Final Assembly

The LEDs, light-diffusing lens and brass are installed for each porcelain ring.

All of the rings get numbered and arranged in a wood guide box to ensure everything lines up correctly.
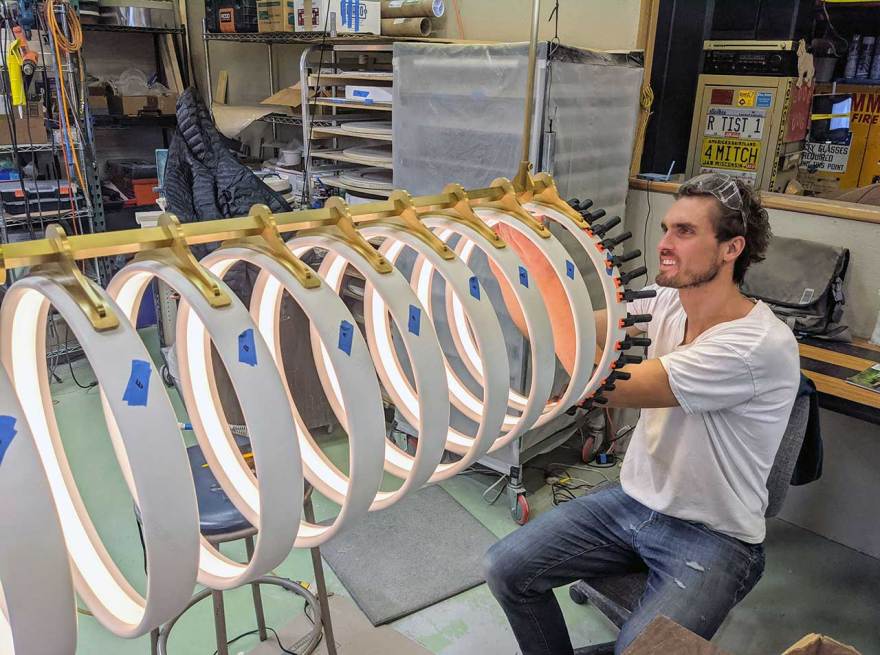
Then the last step is to assemble all of the rings onto the brass spine and solder the electrical connections. Sculpture Complete

Samsara Light Sculpture with designer Ted Bradley


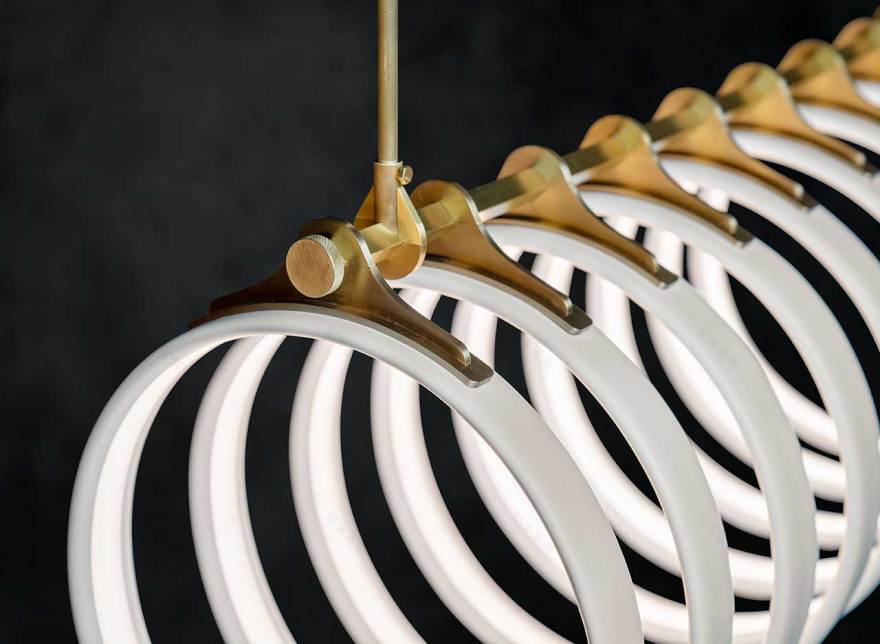


Photo: Joel Reis

Photo: Joel Reis Watch Ted Bradley share more details about the making of the Samara Light Sculpture:

 66
662019/02/06 19:00:00
4052021/08/03 02:45:02
332021/12/01 14:39:21
592021/12/09 14:39:46
212021/12/07 14:41:20
262021/09/17 14:44:30
222021/10/18 14:45:00
32021/08/16 14:45:42
782021/10/07 14:45:47
42021/08/11 14:46:20
492021/09/13 14:46:30
102021/08/18 14:46:46
南京喵熊网络科技有限公司 苏ICP备18050492号-4知末 © 2018—2020 . All photos and trademark graphics are copyrighted by their owners.增值电信业务经营许可证(ICP)苏B2-20201444 苏公网安备 32011302321234号
苏公网安备 32011302321234号客服
消息
收藏
下载
最近